Hello!

My name is Anthony, and my goal is to be able to draw my own comic book and illustrate my own kids book.

To learn as much as I can, I've reset my drawing knowledge and skills back to zero. I now know nothing and hope to start with the basics and grow from there.

Feedback is most welcome!
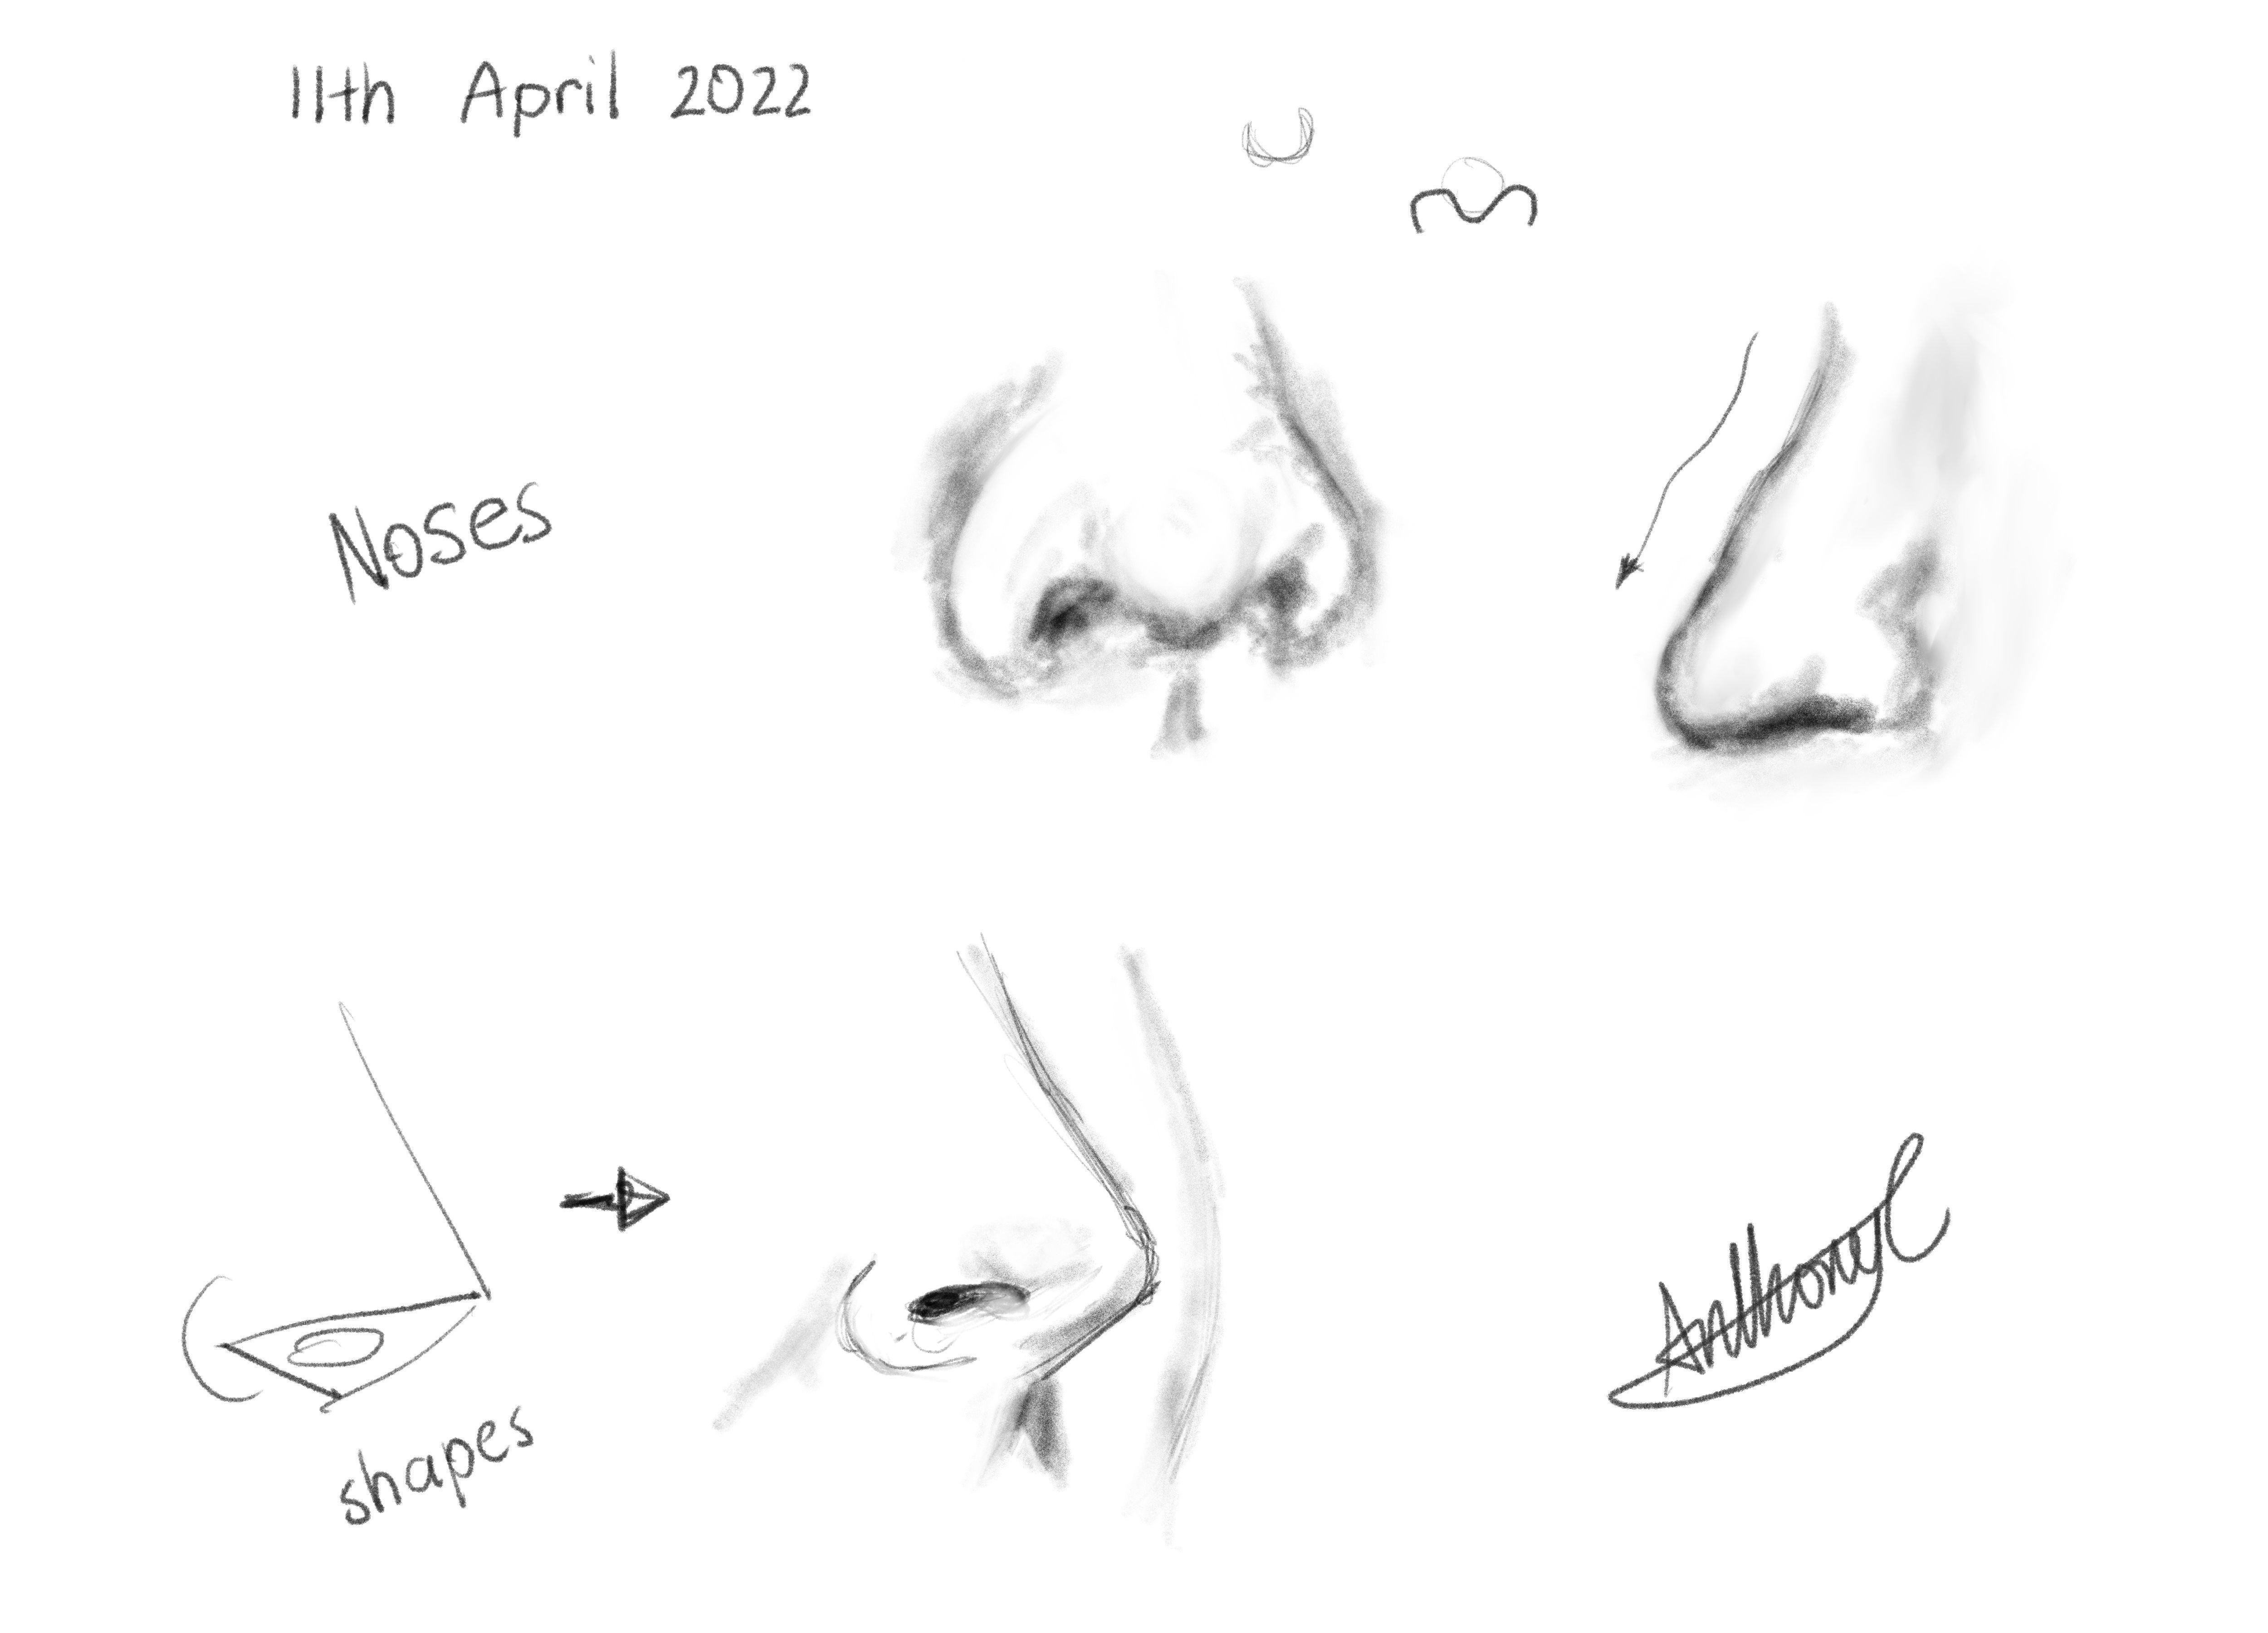
Observation: Nose

Today I observed the nose and tried to break it down into simple shapes.

The shapes I noticed were the 'm' line (front on angle), triangle, and curves around the tip of the nose that was like a small ball.

12th April 2022

Thought I'd continue observing each main feature of the face since I started with the nose. So today was the ear.

Observation: Ears

  1. The ears main outline is shaped like an 'e' or 'p' but it's rotated
    slightly left and looks like it's in bubble writing.
  2. It has many folds within it - like the 'outer fold' which I googled to be called the helix, and an 'inner fold' that's called the antihelical fold/antihelix. This is one of the images I studied to learn the correct terminology, but my observations were from real ears on google.

The inner fold tends to look like a curved 'y' shape from what I saw (more than half of the ears I saw had that shape)
3. The shape where the earhole resides in reminded me of a sideways heart/arrow head (but very curved) or a sideways bell. (The earhole is up higher than I thought as well)
4. I also noticed the ear has this bump that sticks out, which I like to remember it as the ears clitoris - the correct term for it is the tragus.
5. The colour of the shadows also help show how deep or curved each part was. E.g. earhole is very deep = very black.
6. Ear outlines aren't one smooth curved line they actually have lots of sharp edges

And this is my list of observation notes that lead to my final drawing. (Hopefully these steps will help me remember how to draw an ear - 1. 'e' shape 2. folds 3. sideways heart/ear clit

13th April 2022

Observation: Lips - Women

I've always struggled drawing lips so I thought that'd be a fun one to observe today.

  1. The top line of the lips has a stretched 'm' shape or two landscape
    mountains joined together.
  2. The arches on the 'm' can be both sharp or curved.
  3. The middle of the 'm' where it dips, tends to be shaped in-between a 'V' and a 'U' - so not too sharp and not too curved...
  4. The bottom half of the lip is thicker than the top, and bulges out more. (I try to think of a thicker cylinder or barrel or even a fat slug.
  5. The darkest parts on the lips seem to be along the middle line and the corner of the lips. (I assume its because the two shapes are overlapping and it goes inside)
  6. The outline of the lips itself is surprisingly lighter than I thought, you almost can't tell there's a line - otherwise it's very faded unless there's lipstick - So the drawing I did on the top left isn't correct; the top line should actually be much lighter and not so dark.

14th April 2022

Observation: Eyes - Women

Fun Fact: My optometrist friend said that the reason why we don't see the upper eyelid crease from Asians is "due to Asians having more tarsal fat" which in laymen terms just meant they have fat in their eyelids, which makes it push out so there's no crease.

  1. The iris is rarely a full circle it's usually cut off by the eye lid. (You'd typically see the full iris when a person is shocked/surprised that their eyes widen)
    1. The tiny eyelashes on the bottom actually don't touch the bottom of the eye, there's actually a small tiny gap of space.
    2. The eyes aren't actually perfectly horizontal/straight 180 degree, they're actually slanted a tiny bit (from the caruncle; which is where the eye boogers are usually found to the opposite side of the eye - refer to my reference of images on the bottom - 'medial canthus to the lateral canthus')
    3. Most Asians have one eye lid, or a thin upper eyelid.
    4. Asian's caruncle tend to branch down and isn't a full triangle like Western eyes. (I refer to Asian eyes looking like a feather with the stem sticking out).
    5. The light reflection one eyes should always be on the same side.
    6. The upper eyelid/crease is roughly the same length as the eyelid or extends out by a tiny bit.
    7. Pupils (the black dots) are very important in showing the audience where the person is looking.
    8. If you look at the colours of the iris in the reference images below, you'll notice that the iris edges/outline has a soft dark ring glow before it transitions to blue/brown, then pitch black in the iris.

My Reference Images For Women Eyes and Terminologies

I added red circles for the parts that stood out to me for when it came to the 'differences' between the eyes. So I noticed that the caruncle and the eyelids were the main differences between the different ethnic eyes.

The purple and blue lines I drew made me realise how parallel the eyelids and the upper eyelid crease were.

15th April 2022

Term 1 - Line of Action (Nude and Figure Drawing)

Today I primarily focused on Line of Action and practiced drawing cylinders on the figures.

I used this site to get my reference images for poses - Line of Action and I used Pureref to compile my images neatly.

Notes I took:

  1. When drawing the one cylinder try to keep the ellipse and lines to be the same width/size.
  2. Draw the ellipse that's closer to the camera first to help you find the correct angle.
  3. Main joints are the shoulder, elbow, wrist, knee and ankle.
  4. Shoulder joints are on the corners of the rectangle.
  5. The joint for the knee is actually below it.
  6. 3 rectangles for the head, torso/ribcage and the pelvis.
  7. The joints for the pelvis is slightly below the rectangles mid-point.
  8. The line of action can be easier to draw when you mark it from the bottom of the neck (where you can feel the spine bump from the back of your neck) to the end of your tail bone (right above your butt cheek crack)
  9. Also Learnt that 'ellipse' has two 'l's in it lol.

16th April 2022

Proportions for Male and Female

Note: These proportions are for a standing model and doesn't apply to foreshortening/perspective drawing and is more of a simple guide

These are the steps I used to draw Marc's Proportion Chart/Guide (following his video tutorial) - Note: The anatomy isn't accurate, this is mainly for proportion and you can also refer to @charlieodow for an awesome visual breakdown of the notes.

Male Proportion Steps:
1. Draw a vertical line to represent the characters height first
2. Separate the line into 8 equal parts (which represents one head for each part = 8 heads tall)
3. Mark and split the top first square into thirds - This will be for the head
4. Draw a circle around the centre of the thirds marked - This will be the top of the head
5. The bottom of the circle that's marked will be the nose
6. Draw a halfway mark between the nose and the centre of the circle - This will be the length of the eyebrows and draw a horizontal line for where the eyebrows will go
7. The bottom of the first square is the chin - Draw a wide 'V' shape from this point and stop before you reach the circumference of the circle, then connect to the side of the circle close to where the eyebrow line was made (this will form the side of the face/cheeks)
8. Draw the ears starting with a curve from the eyebrow line and have it end near the nose.
9. Then draw the mouth, which is located in between the nose and chin.
10. The eyes will be right below the eyebrow line
11. The neck tends to be close to the cheeks as they have a wider neck (depends how muscular)
12. Divide the 2nd box into thirds. The first marker in the 2nd box will be where the clavicles are located as well as the top of the shoulders. Draw a line on this marker.
13. Along the bottom line of the 2nd box, divide it into 6 parts (The first and last marker will be the outer edge of the ribcage)
14. Draw a circle connecting the first and 2nd marker as mentioned in step 13. And a curved V shape from the bottom of the 3rd box to those markers too. This shape will form the rib cage.
15. Divide the bottom of the 4th boxes the same as the ribs (so into 6 parts again) and draw the pelvis (This connects from the bottom of the 4th box line to the bottom of the 3rd box line)
16. The crotch is the middle of the bottom 4th line.
17. If you go two squares down, this is where the bottom of the knees will go.
18. Pectoral muscles along the bottom of the 2nd boxes (a wide 'W')
19. Shoulders in the side of the 2nd boxes
20. Connect a line from the top of the shoulders to the neck to form a triangle. (Trapezius muscle)
21. Draw a line from the rib cages to the to of the pelvis to form the side of the body
22. Connect the dots of the side of the body to the bottom of the pelvis to form the waist line
23. Form the legs by connecting to the knees (from the waist line)
24. Draw the calf muscles from the bottom of the knees. Note: Inside part of the calf is lower than the outside.
25. Then down to the ankles - Note: The outside bone of the ankle is lower than the inside bone.
26. The feet is like a pyramid.
27. Elbow is right on the waist line.
28. Wrist is on the line below the elbow.
29. Knuckles is around halfway of the box under the wrist and then the fingers connect to it.

Main difference between the proportions from the female and male:
1. Softer curves
2. Neck is thinner
3. Hips go out more
4. Higher navel and waist line
5. Nipples are lower, but also depends on the size of the breast (the more flat the closer it is to the same position of the male)

Note: In real life the legs are actually shorter as they're stumpier.

¡Thanks for the notes! Very useful after a first run through the videos. I will be posting some of the exercises soon and this really helps. Great work!

17th April 2022 to Present (Continuation)

This post now has a BEFORE and PRESENT section instead of ALL my gestures. Thought this might be an easier way to compare my progression as well as condense my post. You can find my daily gesture drawings here on Pinterest instead.

30s Figure Drawing/Gesture Drawing

Using Marc's tips for figure drawing quickly (30 seconds).

  1. Head
  2. Line of action - One stroke if possible (two strokes if legs have an interesting pose)
  3. Draw the limbs closer to the camera first, then do the ones behind after.
  4. Feet for a strong base
  5. Face direction (line for eyes) so we know which way the model is
    facing

I found 30s really fast, but hopefully I'll get quicker at spotting the main gestures. The main trouble I had was not knowing what else to highlight when I had spare time. I put the extra time in the hair, but I don't think that's important? I think I'll try highlight the curves next time like the shoulders and butt - If you have any suggestions on what I should highlight instead please let me know.

BEFORE (18th April 2022 - First Gesture Drawing)

000001

PRESENT SKETCHES/GESTURES (1st August 2022)

000109

18th April 2022

Measuring for Observational Drawing (Measuring with a Pencil)

  1. When measuring with a pencil have your arm straight.
  2. One eye closed
  3. Ear on shoulders
  4. Use the thumb to mark the chin and count how many heads it takes to get the total height of the model and mark each of those spaces. (Remember to keep the arm consistently straight, as having it in a different angle may change the measurement.)
  5. Find the halfway mark of the total height - This will make it easy to know what is boundaries for what parts of the body can be in each half (top half or bottom half). In this example the legs must be below the halfway mark otherwise it's out of proportion.

Marc's Tips
- Creating a box around the figure can help narrow down the proportions. It lets you know how far you can go before it may start to be unproportional.
- Mark out the joints in the grid to help give you an idea of where each body part should roughly be.
- Try create your own landmarks to see how far each line/part is from each other to test if it's correct.
- Looking at the empty/negative space as shape can help indicate to you if you're going in the right direciton.
- Another great guide to test for mistakes is to create an imagine horizontal/vertical line to see which parts of the body line up.
- As well as finding patterns/natural flowing lines (many lines on the body can connect/line up to each other)
- Drawing a bounding box around the model is reallly handy technique for models who aren't just standing still - imagine the model is wrapped in big tight garbage bag
Advice: Never look at things in isolation, always look at the whole image and try find the relation from one part of the body to another to make sure to get the relationships down properly.

Counting/Measuring Heads Quickly with Your Mind

If I showed you a picture of a model posing and asked you - "How many heads of theirs does it take to make up their total height?" - for experienced artists I'm sure it'd be easy for them to give a close approximate answer, but for me, I'm just a beginner so it's not easy to tell at first glance.

So I decided to come up with quick way to do it, and this is what I came up with.

Typically, you'd count the first head, then try imagine the second head, the third, fourth etc until you get towards the bottom of feet - This method of thinking works but it felt too slow for me, especially when it came to do 30sec or 1min gesture drawings.

What I realised was, I didn't actually need to try to imagine and count each head sequentially from 1 to whatever. But instead, I could just imagine every odd numbered head - (1, 3, 5 etc).

For example, if I asked you to draw a circle, then draw the same sized circle under it BUT have it the same sized circle away, I'm pretty sure you'd be able to do it pretty accurately without needing a ruler. (We're actually really good at filling gaps with our brain.)

Figuring this out has helped me a lot, and I hope it helps you too. Sorry if it's not explained well, but I hope this picture kinda makes sense.

TL;DR: Simplifying your thinking by removing unnecessary information. In this case it was imagining the odd numbered heads as a rough measuring guide. E.g. Imagining the 1st, 3rd, 5th, 7th head instead of 1-7.

20th April 2022

Perspective 1

These are my notes from the first 43mins of the Term 1 - Perspective 1 video. (I'll be adding to/continuing this post as I go through it)

  • Horizon line is the most important point of reference.
  • Horizon line is where the sky meets the sea.
  • Eye level is when you look straight ahead.
  • The closer things get to the horizon line the smaller they become. As you get further away from the horizon line things appear bigger.
  • The visible horizon line isn't the real horizon line, it's always at sea level (much lower)
  • The horizon line is always at sea level.
  • If you look straight, the horizon line will roughly be close to the middle. (relative to you POV)
  • If you're short and closer to the ground, and look straight it's not as interesting compared to looking up at things. Vice versa if you're taller, you'll look above/over everything.
  • Convergence Lines - They're lines that converge into one single point. And the point where they all connect is the vanishing point. (always at least one horizon point).
  • Single Vanishing Point is a One Point Perspective

And this is my assignment for the first exercise of finding the convergence lines, vanishing points and the horizon line (and I did the vertical parallel lines too, but note to self that there's also horizontal parallel lines).

Perspective 1 - Assignment 1

21st April 2022

Perspective 1 - Assignment 2

Note: My observation from 1-Point Perspective/2-Point Perspective was that you never see more than 3 sides. And you'll never see the top and the bottom of an object or the right and the left of it at the same time (Which makes sense) - Not unless there's a mirror to reveal it haha.

2-Point Perspective

This is the continuation of the video from the 44min mark and my notes:

  • 2-point perspective uses two vanishing points
  • 2-point perspective makes for a more dynamic image and makes it feel less flat.
  • You don't want the vanishing points to be too close to each other because the image can look very distorted/warped. General rule of thumb: Avoid going smaller than 90 degrees where they touch on the bottom. (It's like squeezing the objects)
  • Have the convergence lines go towards each other not away.
  • You can have it converge off-screen but it'll just make it harder to work with.
  • Marc likes to start the height on the middle corner.
  • You want the convergence lines to touch the corners so you can form the height/edges.
  • Tips for working with shapes - Use simple shapes like cubes first, then you can chisel pieces off to form the desired complicated shape.

Perspective 1 - Assignment 2

Creating Projects

  • 3840 pixels x 2160 pixels (4K resolution)

Wow, thanks for the mention @aphamfx, it really made my weekend. Your notes on each class are fantastic, keep doing that because it helps a ton to come back here and make a quick read. :clap:

Any time Charlie! You truly deserve it. I always look forward to seeing your progression and detailed illustrated notes as well. :grin:

22nd April 2022

1-Point Perspective - Drawing A Room

Perspective 1 - Assignment 3 - Drawing A Room Using 1-Point Perspecive

Notes taken from the Perspective 1 Video on drawing a room (@ 59mins in):

  1. Create project > 3840 pixels x 2160 pixels (4K resolution).
  2. Place your horizon and vanishing point. (For the assignment the horizon is placed within the canvas to keep it simple.).
  3. Create a new layer > Name it 'Guides' (This is the layer with the horizon) > Choose a colour and draw a line for the horizon close to the upper third of the canvas (PC Shortcut: Hold 'Shift' then click & drag horizontally to create a straight horizontal line - this shortcut helps lock the lines drawn in place).
  4. Draw a dot around the centre of the canvas on the horizontal line created to mark the vanishing point .
  5. Create the boundaries of the room - To do this, draw lines to each corner of the canvas from the vanishing point. With this we can now draw the back wall of the room.
  6. Create a new layer to draw the room. (You can use a different colour pencil)
  7. Create a rectangle that connects with the convergence lines of each corner. (This is the back wall)
  8. Design the room using simple shapes like cubes/rectangular prisms learnt from previous assignment.

Things to think about when designing things for a room:

  • Use simple shapes as guides to make it easier for yourself - you can add details to it later.
  • Try to have the correct sizes for objects to make it believable, especially for things that people use like beds, chairs etc, other objects like storage cupboards etc don't matter as much.
  • Rooms are typically 2.5 metres tall. (8-9ft tall).
  • If you split the height of the room into thirds, an average person's height will be close to the upper third line.
  • A person is on average 8 heads tall

24th April 2022 (Continued)

Perspective 1 - Assignment 3 - Drawing A Room Using 1-Point Perspecive

This is a simplified version of my apartment living room.

Nice work! I really love to see your work and your notes. I do similar things myself as it really helps me to come up with a process which I can modify over time. Fantastic work! Keep it up!