So good! only thing that stands out to me is the hands on the second drawing. not sure they should rotate as much as you have them drawn. at least I wasn't able to replicate that angle in person. Great rendering style.
Ooh, these turned out nice! I really like the lighting in both of them. I also like how you executed the blue tips in the hair on the second one, it's really beautiful.
Wow those two pieces are really great, Michaela!
Theres just one thing I am not quite sure about:
In your second piece, the girls hands as she is tying up her hair are extremely pronated. I‘ve tried to do that pose myself and, as I am an inflexible dude, couldnt do it. It feel a little unnatural to have the thumbs turn upwards. Letting them point to the floor feels more natural and easy.
Hope that helps✌️✌️
17 days later
[Term 2] Anatomy 1
It's been a while, but I'm back with another set of study pages! I'm officially on summer break now too! It took a long time but I finished taking notes for the facial features part of the lecture. I'm going to do studies of each facial feature in sets of 10 + 2-3 from imagination. Here are my lecture notes and ear studies 
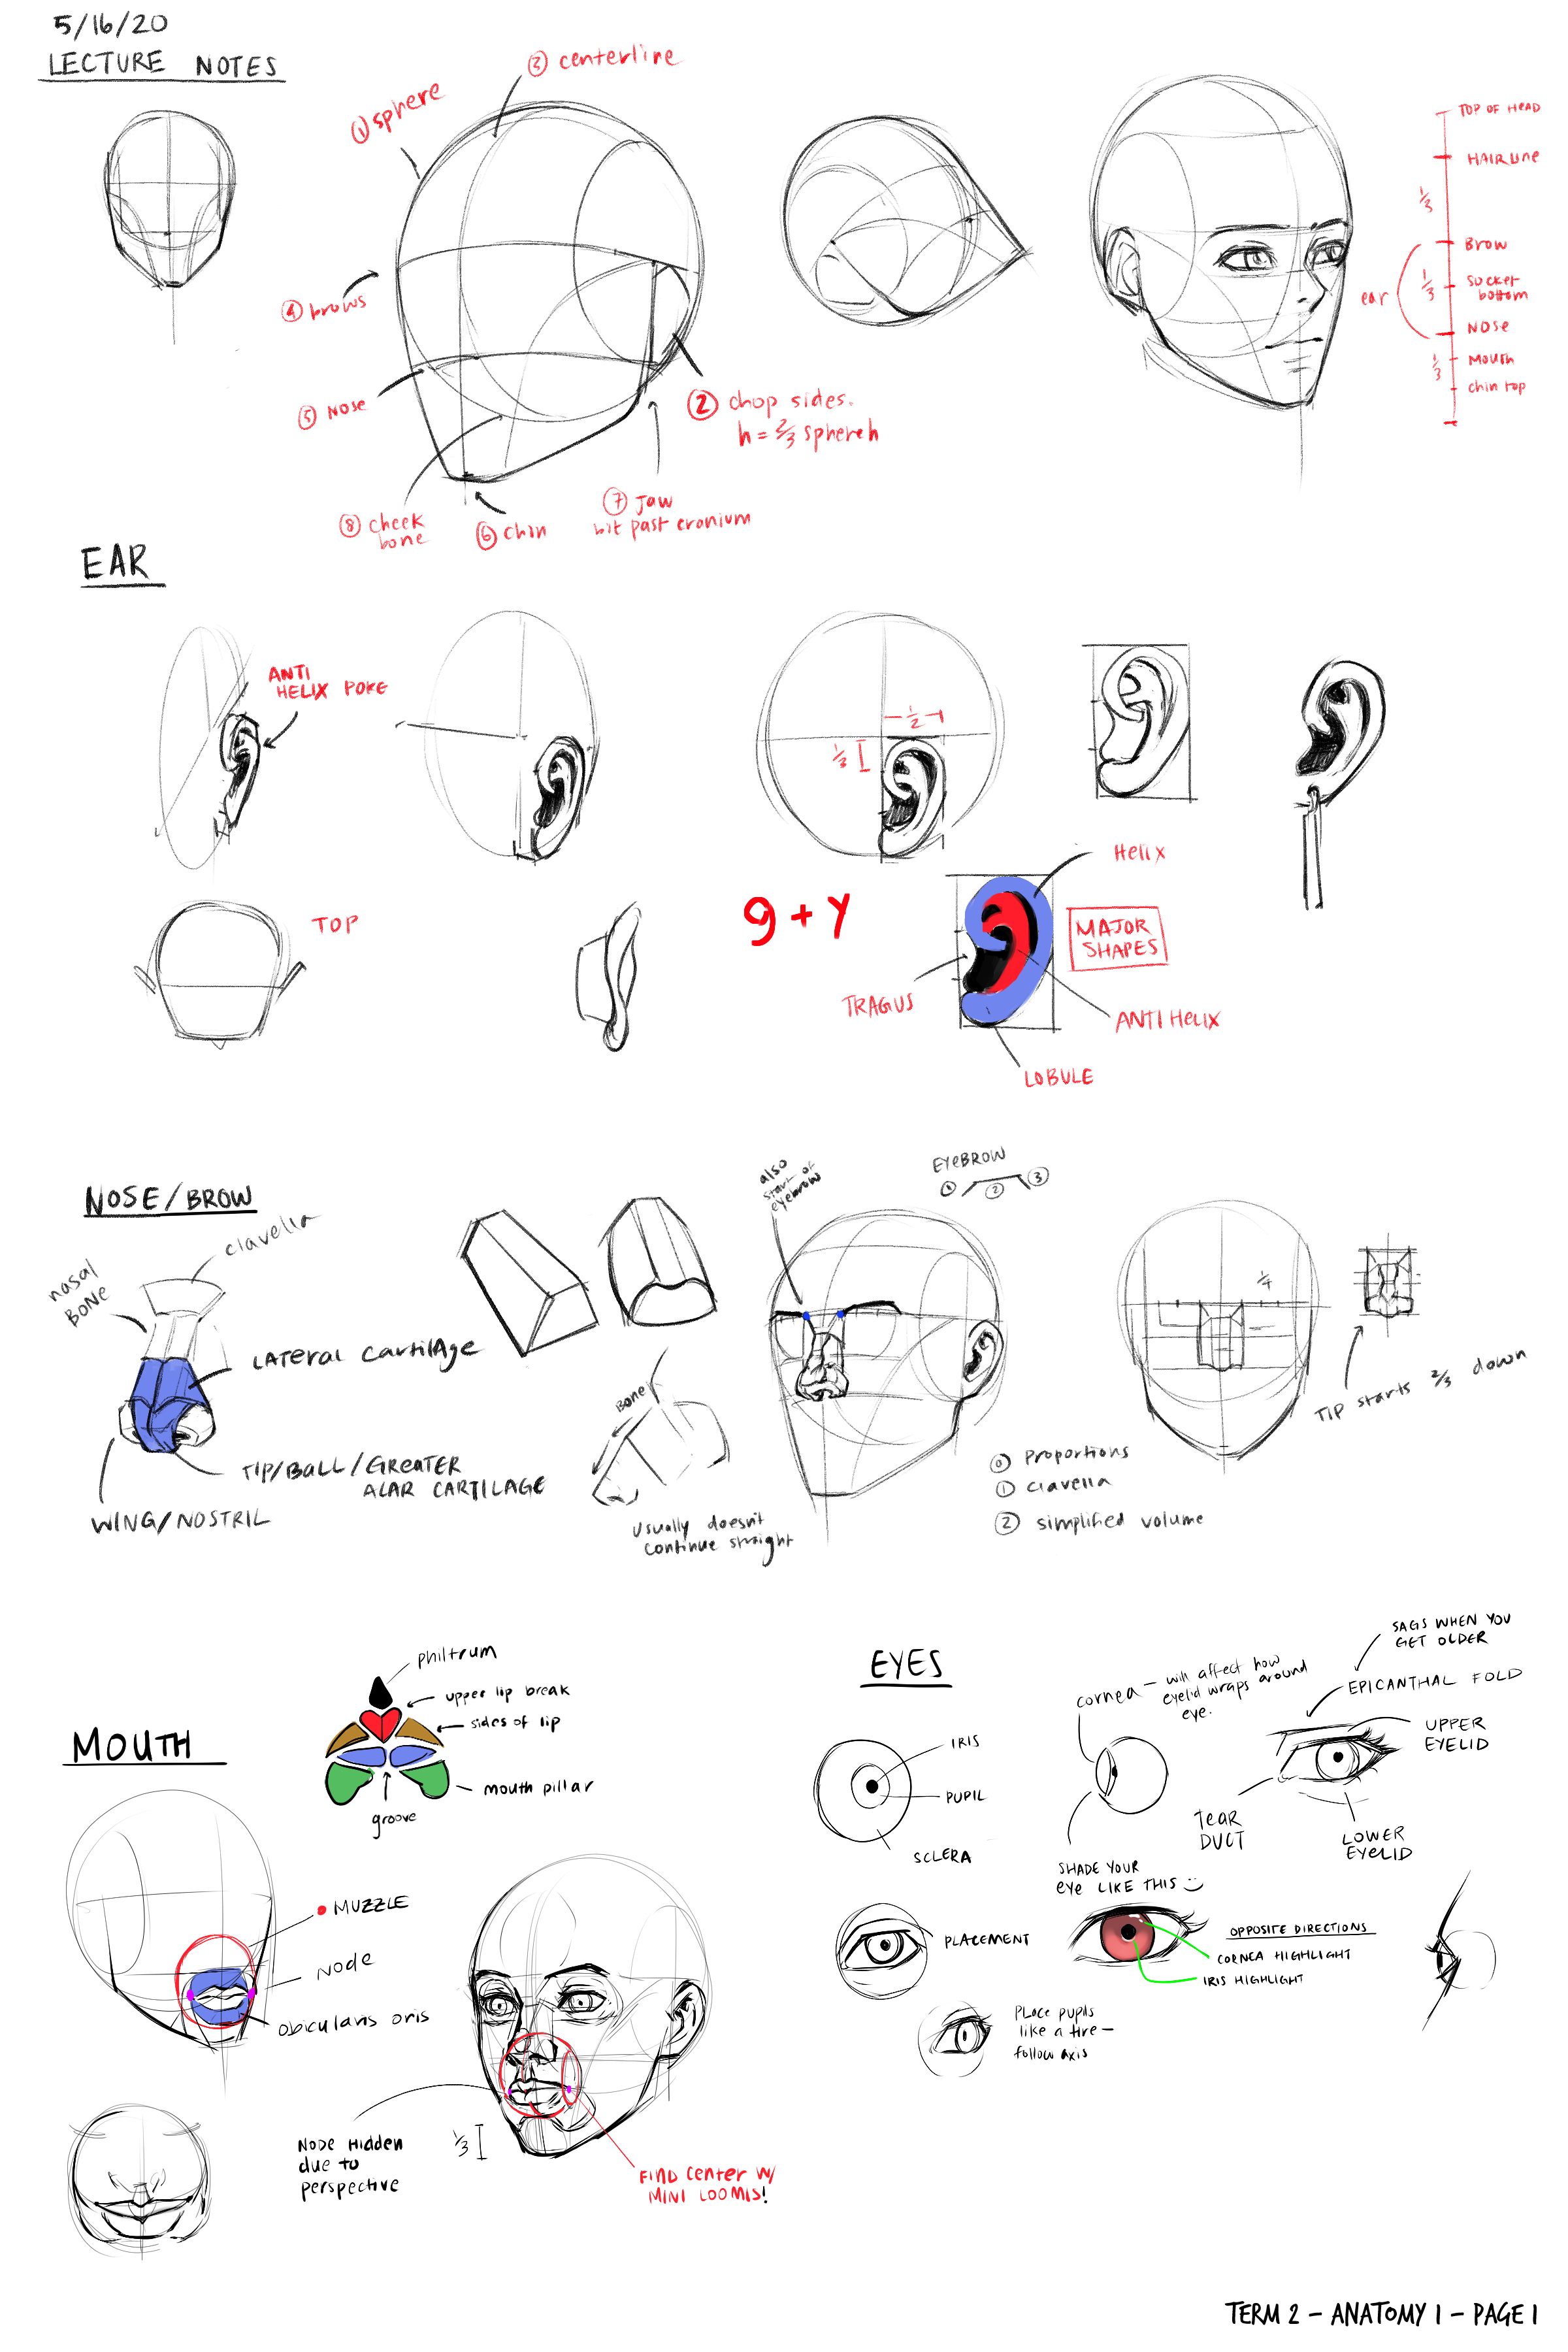


For the ear studies, my basic method was:
- Sketch
- Base silhouette + shadow shapes
- Overpaint focusing on:
- Midtones
- Occlusion shadow
- Highlights
- Accent color/color variation
- Any final touches with a hard brush (no opacity).
I haven't done painting studies in a long, LONG time so it was really fun to do these. Usually people see their improvement in their personal pieces, but I'm seeing improvement in my studies instead because I don't do them as often hahaha.
I think you did a great job on those assignements, michaela!
Your heads have good structure and I really love you ears, especially the sketches, they already convey a good sense of depth even without any rendering👍👍👍
6 months later
Haven't posted here in a hot minute! Finally done with noses
I've been doing a lot of personal art (which you can see here https://www.instagram.com/milkcee12/) but not as many studies.
I feel bad about it, but one of the things I want to work on in 2022 is only comparing my progress to my past self. So, I'll count this post as a win. I've started studying again.

These are so good! The way you use colors is extraordinary!!
Wow your rendering is incredible. :o
(01/04/22) Some lighting warmups with an oc.
(01/06/22) Eyeball sheet finished. Just got the lips left, then portrait photo studies 
Page 3 Reflection
- I thought eyes were a super detailed/complex part of the body, but
they aren't. It's a part of the face that's mostly soft edges; the
highlights make a HUGE difference in the perception of detail. - The shape of the highlight was the most impactful in describing the
form of the pupils. Make them follow a general curve and your pupil
will seem round and full of form. - Resist the urge to draw every eyelashand eyebrow hair.

ahhh your studies and art look absolutely mesmerising. i love your style. 
This is the final page of facial features! Going to move on to photo studies now hehe 

Page 4 Reflection
- Use the underpainting to separate light and shadow. You can add color variation after, but focus on the light patterns first.
- Don't use all the same size brush strokes. Shape variety, like how you rendered the eyes!
- Lipstick != lip forms. Lipstick is simply color on top of the forms of the lips, they can be applied smaller or larger than the actual shape of the lips.
In general, I've been really happy with how these studies turned out. Before starting ART School I was already somewhat familiar with the anatomy of facial features, but I had never taken the time to study them individually. It was a good mini-project to get back into studying again, so now I'm excited to try some more ambitious studies
--
Finally, for personal reference, here's how I plan to do the portrait studies (and finish off Anatomy 1!)
- 12 photo studies (6 male, 6 female, 2 extreme angles, 1 senior, 1 child)
- Original character (10 angles, goal is to preserve likeness)
Your studies look amazing! And I know it was an older project but your room assignment turned out really really cool!
Aw thank you so much!!  Gosh that piece was done a while ago, it brings back memories.
9 days later
First two portrait studies.


I went for some self-indulgent studies at the beginning to get started, really enjoy how the first one came out. I want to focus more on brushwork in future studies, and I don't think I'm capturing likeness well so I want to work on that as well.
These look very good!
For me I don't really focus too much on getting the likeness. I just focus more on lighting and color which to me is more important. I like to draw the face well enough so that it doesn't look off. So from my perspective, these are amazing studies!
However if your goal is to get the likeness of the face as well ( second study), then it will become much more difficult as you may have experienced. The three main problems I can see are the ears, eyes, and mouth.
Ears: I think you got the length of his face pretty well. But his ear ( to our right ) is a lot smaller than in the reference, which consequently gives your study the appearance that his face is longer than it is.
Eyes: I have troubles with realistic looking eyes a lot cause I always seem to draw them bigger than they really are. It's even harder when they're wearing make up like in the reference here. You may be able to focus on the shape of the white parts of their eyes to get a more accurate size.
Mouth: If you look at his mouth on the reference, you'll be able to notice that more of his teeth show on his right. That most likely suggests that he is smirking there so the right side of his face will lift up more along with his mouth. Notice how in the reference his mouth is a bit tilted, but in your study it looks to be fairly straight.
Again, these are only problems when trying to capture the likeness. Anatomically I don't think there are issues with your study. I hope these pointers can help!
And as always, please take everything I say with a grain of salt. I may be correct on some things, but wrong on others.