• Gave myself 5 days to do something. This is what I managed to do. I'm trying to get better at illustrations, but I have patience to work on something for 3 days maximum :( Splash_Process.jpg5000x3140 2.21 MB Splash_Process-6.jpg3896x2429 2.83 MB concept list char copy.jpg5388x3000 1.7 MB
    21.1k
  • Did a character concept for a course.https://www.artstation.com/artwork/P6gm3y - more:) list1.jpg3541x1920 2.82 MB
    21.1k
  • Day 4: Star Wars May The 4th =] Queen Padmé Amidala in my art style! First time drawing her and I really enjoyed making this one! Used watercolours, ink pen, acrylic markers and gold paint for accents on my Canson mix media sketchbook. I hope you like it!
    83.2k
  • A creature design from a while back
    by
    6.8k
  • Here is some more recent stuff, I need to make more body studies
  • It's been a while and god, it is so cringe to go through all previous messages xDmy study.
    21.1k
  • Thank you! I finally cleaned that up. Meanwhile started 3 more ..I have a habit of taking too long to finish a piece, then I lose interest in it and just start something else. I found 8 from recently i started and abandoned, that are decent enough to not delete, but not finished. There’s also been a number of drawings I felt I “outgrew” - became better before I finished them, and it would be easier to start from scratch than fix them. Anyone else thinking that?
  • Lady Death Fanart Collectible: Part 6 Polypaint and base Hi, it’s time to share with you another part of the process to create this fanart piece. Polypaint As this is my first collectible fanart I didn’t have previous experience with polypaint so I tried my best and played a bit with it.I wanted to give a ghostly and eerie look to Lady Death, she is beautiful and deadly, but at the end of the day she is a woman that died and was reborn at hell as an avenging spirit, that’s why I gave her skin tone a bluish very cold tone.As you will see I gave myself some creative freedom to deviate from the traditional color scheme that this characater has in comics and illustrations.To add a bit of sensuality by painting some freckles on the face and the chest. The dark nature of this character was the perfect excuse to gave her a kind of goth make up, very dark shadows around the eyes, blue lips and fingernails. I know that the original character includes sexy red lips but I wanted this girl to have a sexy but at the same time creepy look, that’s why we can see some thin veins emanating from her eyes. The biggest chromatic change I did for this character is at the hair. Lady Death has a characteristic white weavy hair but in my fanart I decided to gave her a very saturated blue color.The reason behind this wasn’t only an aesthetic choice. I want that the face area strongly pulls the attention of the viewer so this area needed a stronger contrast. Another reason is that I want her to have a more modern look, as I mentioned before, I’m strongly attracted to women with goth/punk look. I gave myself half an hour or more to analyse the work of experienced sculptors that create collectibles and I discovered that the use of darker values on the skin is often applied to create a greater sense of volume and three-dimensionality. I found that areas with heavy ambient occlusion are the perfect places to paint with darker colors in order to increase the separation between different forms. Even though she has a bluish skin tone, I used a bit of warmer hues in areas that, in real life, tend to go towards red and pink, this is very obvious in the nose, cheeks, and knuckles. Thinking with a logical mind it’s completely absurd to have warmer tones on the body of a zombie like creature but I didn’t want to limit myself by using only blue tones, it looks boring and artificial. In real life these colors are created by blood vessels in areas where the skin is very thin. ** Scythe **for her weapon I applied a cool gray with some warmer variations, this color scheme is influenced by the work of H.R giger. Base I’d like to talk about the design for the base which, to be honest, I forgot to develop along with the character.My main idea with the base is to show that Lady Death inhabits a very sterile and arid land, at the end of the day she is at hell.You can see a that she walks over dirt and rocks, a sign that she’s surrounded by death and loneliness. As part of the landscape we can see some bones and skulls to reinforce the idea of lack of living creatures, yet we can see three hands that try to reach her legs.This hands represent that all creatures are subordinated to her power and seek an evil blessing with a simple touch of the princess of the damned.1- The hand with skin burns represents the souls of those who are newcomers to hell, tortured souls that suffer for the sins comitted on earth.2- The hand with greenish rotten skin and pustules is the reminder of the decay that has infected the souls of those who have been trapped and have forgotten their humanity3- Last but not least, the hand of a demon shows that even dark creatures and entities bow before her presence. The cherry on the top, at least in my vision, are the simese twins that emerge from the ground, this malevolent creatures remind us that in hell there’s only perversion and any trace of innocence is lost. Thanks for reading till this pointI’m really happy to be very close to finish this creative journey, last but not least it’s mandatory to talk about splitting the sculpture in several pieces to be printed, this will be my last entry before showing the final rendered images. See yaMay Zbrush be with you
    1.5k
  • memory 2min gartic phone, used ref 2m gartic, used ref for pose 2min gartic 2min gartic 2min gartic 2min gartic memory memory memory memory study memory memory memorymemory memory memory memory memory memory study memorystudy study stylized left memory, right study study memory memorymemory memory memory memorymemory memory, porportions r offmemory memorystudystudy memorymemorymemory memory memory memory memory memory memory memory, right leg is a bit broken The feeling of only getting 1 - 3 likes on a social media post will never not be discouraging. But nothing is discouraging enough to make me quit drawing. I think the strategy of drawing a lot of stuff and waiting a while to post is good though rather than posting it immediately and then feeling that sadness on the next set of drawing
  • Urban Dragon Girl Wip Urban Dragon Girl_wip1.jpg5000x5000 1.11 MB
  • Long time no see! New artworks produced lately
    6.8k
  • studies studies juri study imagination, how I feel before a speech imagination imagination study something I drew for my presentation also drew this for my presentation, didn't fix the one hand being bigger than the other imagination + study study studies study study, I need to fix the face a bit based on screenshot from anime but in my style study. except for the eye study studies studies study. changed some things tho imagination imagination imagination study studies, except top right samurai based on anime screenshot wolverine studies, changed some of the poses a lil, not very good at all, but first time i drew the character ever. semi study studies study imagination imagination imagination , for first time ever i tried to draw over 3d model for middle pose, I dont like the result tbh, but it makes it much easier than coming up with it from memory.imagination, except right figurestudies imagination + studies, coming up with action poses r hard, these are not dynamic enough, I will redraw better ones in future. imagination , imagination imagination study, except for eye imagination imagination imagination doodles except for the two chrollos imagination storyboard thumbnail, idk if i ever shared this. my storyboards end up being a little detailed since i usually just draw in one layer.
    by
    22.6k
  • Quick fun sketch. CyberFish.jpg2394x3857 674 KB
  • Neon Gambit This is a fan art of my all time favorite character Gambit from the X-Men.I made this a birthday gift (26.04.2024) to myself and honestly I really do like how it turned out in the end =] I hope you like it as well =]
    83.2k
  • Art Blog - April to September 2023 Suffer a little burn out. Look at some memes. Here's some art from in between. critique.jpg1333x5736 1.77 MB
    20.8k
  • And some more! Been painting over them a bit more this time. Some variants I tried for the old guy using mainly the liquify tool. Someohow looking a bit like Owen Wilson (not intended :D)
  • Cafe sketch/color study
  • Hello! My name is Vithor, I am from Brazil, studied Design at a local college worked as an illustrator for more than 10 years. I took a time off around 3 years ago and am trying to get back in my art shape and maybe become professional again. Here are some recent pictures: You can find timelapses for most of them on my instagram: www.instagram.com Vithor Albertim (@vithor_albertim) • Instagram photos and videos 123 Followers, 638 Following, 19 Posts - See Instagram photos and videos from Vithor Albertim (@vithor_albertim) Comments and critiques are always welcome.Cheers!
  • @patrycja.lerch Thank you I created another variant, which might capture the witch look I was going for better
  • Thank you @daceronine! If I remember I save in google cloud, I will have to stick a note to do it more often. Lamp is from life. Poses are from refs but I look at refs for a while and then try to do it myself and look it up if needed. Outfits and rest is from imagination Something went wrong while installing system so we will have to wipe everything again... pc works but something is wrong. We will wait till internet is done and I will save everything on cloud this time Threads came out in eu. It's been 3 days and I had more engagement than after half a year on instagram. It feels really nice I hope it stays this way A portrait of old dude. It's the same character I posted a while ago. Inspired by Bayard Wu work. At first I thought of him as a bear but I named him Fenrir and I think wolf suits him better. Eye gave me a bit of hard time but I think it is fine now. I focused on face and forgot about area below. The way I draw hair clashes with greying hair. I had the same problem while doing Lohse's white hair. Does it looks like it is greying here? I love how desaturated red looks blue there. I keep lying to myself that I will use different color scheme but It all comes down to this blue and yellowish one it is just flipped this time Have a great day!
  • Been bad about posting updates on the forum. I figure I should just throw down stuff. instead of waiting until I finish something.
    14.8k
  • Havent done much this year since I am focusing on learning programming and deving my own Indie Game . But here 's a New Year Piece 2024 , she 's the mascot for my Game Studio - Lucid Realm : Lucid Chan ! LucidChan_v001_sketches.jpg3072x4352 973 KB
  • IMG_0637.jpeg3240x4050 1.6 MB
  • Long Crested Eagle studyI had so much fun making this one and honestly I love that Eagle! It looks so cool! Used for this one high quality watercolours, high quality watercolour sketchbook/ cold press and it was 300 grams paper.I hope you like it!
    83.2k

holy cow! (pun intended!) This looks amazing! I can't wait to get to this! Thank you so much for responding and re-posting! SUPER RARE! --

The face looks sooo good, and i'm looking where I should be!!! And Wowza on the wing now that you can see it! Such a cool shape!

It's got my brain going and I'll show you how to use those darks to your advantage for form depth in rendering as well as the value and color composition!

Sorry for all the exclamation points!

Critique Part 2

I want to give you this before we start - and keep it in mind because I am going to circle back to it.

What my goal is for you today through the examples and the paint over – is on clear separation and simplicity – specifically showing you the power of one shadow's edge rather than adding excessive (light and shadow) detail to every wrinkle or fold.

Disclaimer : Any examples I draw or paint over here are not what your art should look like. They are attempts are to show you a theory, tip, or hack to give you a brainwave and motivation to improve your skills. A white knuckled grasp at the next ladder rung. Only you can decide what your art should look like.

I decided to type out everything and work on the paint over this time while still trying to work on the RL stuff. here we go.

1 - Information in the dark (dark subject light background) - Examples

Lets take a look at this.
The main focal point – (large figure) is a dark subject on a light background.
Also - a Cool Figure, on a Warm Background

Victor Ferraz - "Grotesque Gift Legends of Runeterra, By Riot Games"
https://www.artstation.com/artwork/XgZokL

Look how the majority of the figure is in the shadow side of the main big lights notan. We are looking at the shadow side of the figure but we see all of this form information thanks to the ambient light. We also have depth separation with some extra oclussion shadows and even highlights on the more specular parts like the eye, and teeth. Every element (or every single different surface type) only really has two to three values tops. The trick is - it is just the gradients going between each value that we see. Nothing in this shadow side is casting a shadow - but there is plenty of form shadow caused by the bounce light below, and the sky light above.

Look at the Main part hit by the light side however (Where the sun is hitting it on the right side)– this has no highlight and midtone relationship. It is just the mid tone with a glow effect– there is no white anywhere – this simplifies it for the human eye – the more information we have the busier it looks – and the less organized we get as painters and draftsman. Lets move onto some other pieces - but we will come back to a post Victor made just the other day.

Poison Scarlet - Hero Skin by Tales Irie
Dark Figure - Light Background
Cool Figure, on Warm Background


https://www.artstation.com/artwork/nJB4gO
Here we have the same thing again. The majority of the figure composition resides in the dark of the notan. Look at the post to see more process stuff from the artist regarding this value pattern planning. And again - every element either light or dark side has two colors (or values)

2 - Information in the light (light subject dark background)

Lets look again with another one by Victor Ferraz
https://www.artstation.com/artwork/XJ3l8R
Light figure on a dark background.
Warm Figure - on Cool Background

Key light is like a studio light – with diffusion panels in front of it. It is soft, muted and spread out. The opposite of what a spotlight would do.

There is almost no ambient light hitting key light shadow notan. The background light is scarce – and there is no secondary light source like magic or rim light. It sets the mood to a different one than the first piece in this post - incredible that it is the same artist isn't it? It's really fun to see everywhere when people utilize these principles.

Look at the shadows. There is only one dark tone for them for every element.

Same artist. Full control of the four lights we use as illustrators. Fascinating stuff.

The Four Lights

Keylight,
Ambient Light,
Rim Light, and
Background Light.

I highly recommend getting a close up from the link - and pouring over the masterful brushwork and value control. You will learn a lot. It might seem overwhelming - but you will see again that it is mostly two values that are describing all form with a third one (occlusion or highlight) complementing the focal points. (Or providing more information for the eye to digest - thus creating interest - focal interest. The focal points.

Whisperer Azshara - Hero Skin - by Tales Irie
Light figure on Dark Background
Cool Figure - Warm Background

These are the same two artists for separate composition styles. (see the counterchange in color temperature and value as well?)

3 - Lights, shadows, and their names

Our four main lights we use as illustrators:
Lights
Keylight,
Ambient Light,
Rim Light, and
Background Light.

Shadows
Main Shadow
(The main form separation of shape. 2 Values)
(Can be cast shadow or form shadow)

Form Shadow
(created by Ambient light / Bounce Light)
(goes inside the key light shadow shape
(also created by midtones on the light side of notan),

Occlusion shadow
( in the shadow - helps separate the forms and create depth when objects get close.

LIGHT SIDE
Midtones
(In the key light side)
(think of them as form shadows on the light side.)
(But they are also your rich color areas. They have the most area to play with rich and vibrant color - they can get almost dark enough to be misread as shadows)

Highlights
(Inside the Light side of the Key light- The highest peak angled towards the viewer eye.)

Warm / Cool Simultaneous contrast

Go give this specific critique I made last year a read - it covers a few things that I have not covered here and would be good supplemental information. It covers what I have not done here with Hue Counterchange / Simultaneous Contrast.

DEMONSTRATION

1-FAR AWAY WORK SPACE

The artists that came before use with no digital art capabilities had to walk across their studios to see the marks they needed to make. At the museum you will see close up that details are just blobs and blasts of the brush. But far away they are detailed and precise. The cause is our human eye. So we need to paint with this in mind. There are two ways to do this. Paint with an ABSOLUTELY HUGE CINTIQUE, OR TABLET AND SCREEN – that way you don't every have to zoom in.

The other way is to do what I do – with a modest sized monitor and tablet. Set the second window in whatever program you use to always see it in the print size it is going to be printed. Details will be lost when you print something like this for a playing card for example – and the simplification of form shadows that I will talk about in a moment will become so important.

We need it to read at the distance it is most commonly going to be viewed. The only way to do that effectively is to remember to zoom out constantly and get sick all over your keyboard. OR you can keep another window open, make your marks and check them.

If it reads well at this distance we don't need anything else.

2-Composition choices.


Please do not be afraid to check things in actual thumbnail sizes. This is important because you cant always throw it too your phone or another screen. Mirror constantly and make big sweeping changes by getting a second look. We will be working big to small in theory.

3- COUNTERCHANGE -or - SIMULTANEOUS CONTRAST -

An example of just value COUNTERCHANGE
From Top down: Light to Dark Figure, against Dark to Light Background
This makes the interest concentrate where we need it too. It gives a POP from top to bottom for this composition. Again this is just extreme for an example - you might choose a different style of light and background choice.

Your figure is a light figure on a dark background.
It is also a warm figure on a cool background.
The focal point is the face and upper body – lit by a strong and close lamp light that is in front of the torso.
It is warm.
So the choice of the rest of the shadow is going to be cooler because of its relation too it. THAT DOES NOT MEAN that the shadows are blue and the light is orange when YOU paint it. It just has to be cooler to create a clear separation. (side note = Just remember skin is different. Once it bounces around on people it becomes orange in the shadows sometimes.)
Your skin is greenish blue however. A less saturated green, looks warm next to green. Anyway – back too it.

So we are going to use that to our advantage. Although you have a triadic color scheme for the subject – there two points of the triangle in the warm side of the color wheel – so it is predominantly warm.

Using the light lets make here go Warm to cool from top to bottom. And the background the opposite – warm to cool from bottom to top – so the relationships of the overall complimentary color scheme sort of push each other like the value counterchange I was talking about. Here we want that to be very subtle because your mood is very magical and dramatic – we don't need to have the pallet and color scheme be happy and contrasting harshly (read Cearly's mood books to see what I mean) .

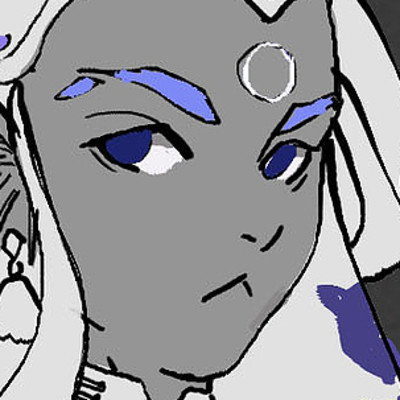
4 - Focal Point- Notan – FORM – and Contrast= Re-work

I am no wordsmith. And I had a few different principles that I am trying to convey today. So please stick with me here. I will get through this as fast as possible

Howard Pyle's teachings on values repeat the importance of clarity and simplicity in organizing the light and shadow to show the “essence” of a subject – and composition. This theory was passed down to me from generations of teachers as putting your information either in the light or the shadow – never both. It allows the focal point to stand out – while avoiding visual clutter. Notan, as I have been referring, the balance of light and dark, is foundational to this practice as well. A convenient shortened term – making simplified way to talk about it.

What my goal is for you today through the examples above and the paintover – is on clear separation and simplicity – specifically showing you the power of one shadow's edge rather than adding excessive (light and shadow) detail to every wrinkle or fold.

The point is for the composition to remain harmonious, engaging and draw the viewers eye to the most important areas – the focal points. To tell the “story” with your illustration. Instead of struggle with any sort of technique.

This technique – follows the theory of Howard Pyle's – that strength (in the illustration) is built not through excessive contrasts, but through thoughtful organization.

I want this to be your golden rule to rendering -
In notan, the lightest shadow in the dark side must always be darker than the darkest midtone in the light side. This ensures a clear and harmonious separation between the light and dark. Lets see me try to use that in the figure and their clothing as a demonstration.

Here I have “turned down” the contrasting notan of shadows that you have on clothing. To remove interest and “overly busy” feelings of form in those spots - and simplify.
I have painted areas of occlusion on the hair and near the arm, and the hair behind the back. .
Turned up the contrast by painting harder terminator form shadow on her face.

Look at the examples above. My guiding principle is that there are only so many values and colors you need to use – to make a clean and organized painting.

Notice the pallets – a highlight and midtone, a shadow (core terminator, and some occlusion) and the ambient light bouncing into it.

5 - Face The Music

The face and hands are everything. Often times you want to be able to use an illustration for as many assets as possible. What looks good here this far away – must possibly look good close up – to an extent. Remember, our talk about distance painting.

However – portraits, hands, hair. All of those are very important on female characters for communication. I find myself saving them for last to spend the most time on when everything else is done. That way I have nothing getting in my way of rendering with the correct light and color.

It at least needs to look good for a character card, bust and portrait distance. So I am going to zoom in on my other window a bit – to keep the appropriate distance, and go to town on some details.

6 - "Fix it in Post"

Remember that we are digital artists that can edit anything. Utilize all the tools at our disposal.

It's really fascinating because as long as you get two values of pixels down for every element you can manipulate them to exhibit form however you want with an assortment of layer effects, or gradient maps. I like to just paint form down and adjust later if I need it. Often times I personally increase the levels contrast a bit along with colors. Personally - because as I mix colors on the canvas it gets rather dull. You will learn similar things about yourself as you paint and become your own worst critic.

Closing thoughts

You could go over all of these ideas with your other pieces and start to see how you can use these principles in your own work to make them more professional. I just want to help out as much as I can since you were concerned about making money and this was a proffesional endeavor.

These tools I have gone over are going to be very important for the rest of your life. I want you to watch how other people manipulate these same theories in different practices and styles. Everyone does this same thing in different ways.

Get those resources. Watch and read them. Paint. Ask for more help. That is the circle that you have to keep closing over and over again. Ask the experts who skip all the shit that is not important. Everything is a shape. Simplify.
Paint, ask the experts, learn, and correct. Move on. You will get better and better - to the point where you know what it is you want to study next, and what you want to draw next for fun.


I swear to God you are right on the edge of super pro work. You will grind down a process and stick too it. Go look for warm and cool figure background relationships, figure and background value relationships. Counter change relationships. Observe how all of the pros use this composition method to make everything "POP" off of the page and give it an impact.

And you are going to knock it out of the park. I hope this can make some stuff click for you.

I'm posting this late tonight - and If I have anything after I read over it tomorrow I'll think on it and add it in. - I've already edited it a few times for clarity.

I edited in a video that I wanted you to watch regarding your figure compositions - it took me a moment to find it.
Create scenes with DEPTH that read CLEARLY! - Narrated Procreate Timelapse

And the Large Medium Small techniques for your use of compositions
CHANGE THE WAY YOU SEE SHAPE DESIGN FOREVER! (Really)

Now I'm going to go draw this week and get some stuff put together for my own art posts. This critique has really got me jazzed up for making more stuff and motivated to get learning the things I've put off. Thanks for the opportunity.

Best of luck. Ta for now.

Alrighty! I've taken everything you gave me in your last reply + some of the material you recommended, and I got this as a result:

My brain is a bit fried when it comes to talking at the time of posting, so I'll keep my comments brief:

I wouldn't call it done yet, but almost? I'm thinking of making the background look like a classic dungeon hallway, with simple bricks and maybe some moss. Just something to create a mood with low contrast to not steal the attention from the character? I think that putting something in her environment for her magic to interact with might make sense too. We'll see. At the moment though, I just wanted to test some lighting to see if the colors/values would work. If you have something to say about that though, I more than welcome it!

I think my values are much better, and so is my composition thanks to you and your advice! I'll be sending this version here and on other critique spaces I can find to see how I can make it look "finished". Let me know what you think :smile:

Your help means so much and leveled up my rusty work a bunch. I appreciate it so much, really.

I wish for you to have some fun with your artwork this week! May I ask where you post your stuff? I'd genuinely like to see more of what you do.

Cheers! :wave:

Wow! That is amazing! I am overwhelmed with your progress in such a short time. Your dedication is commendable.

Congratulations!

Follow your instincts. Try it out. If it doesn't work - toss the layers into a layer group called "trash" and save it for later.

Creativity, in my experience, will come from the act of doing in the moment. Trying things from your mind, will often snowball into something greater - when you make them manifest. Think of those things or ideas - as the stepping stones to something greater which you cannot imagine on your own. Suddenly you will see the patterns uravel before you. As if it were all laid out as it was always meant to be.

I mainly post here on this critique section, but when I have time I post stuff to my blog here. I'll link the latest post and you can scroll up to look through the years.

There is not much more I can offer outside of understanding the fundamentals. Reworking a piece until it is perfect - can beat a dead horse. Only you will know when it is done. But it does need something - and only you can struggle with that.

I also think you are ready to move on to creating a new pieces with your new found knowledge. Have your work portfolio - A personal portfolio. And when you have time - personalized Intellectual properties portfolios for those corporate overlords.

I recommend studying your favorite masters, or your own art gods. A good place to look would be the golden age of illustration and the students of the Brandywine school.

When you study your favorites. Make notes on how they use the principles you learned here these past weeks. The obelisks of Visibility, Mood, and Energy surrounding The pyramid of drawing, values, edges and color, and all lit by the eclipsing sun of contrast.

Value patterns and focal points. Weight and tension...note it all.

The last thing you could do is sort of 'buy' connections, by paying for mentorships. They are kind of like purchasing contacts and getting paid critiques from people who have connections. People you want to know and can recommend you to people when you are ready. A great way to meet other serious people. And you need that. Because you are one.

Your own observation is a more valuable tool than other peoples opinions. Especially now that you know now what they are manipulating in their own artwork.

Just LOOK at this!

Thank you so much for replying! It has been a real honor to have helped you grasp the next rung with white knuckled fist.

Ta for now.

First off: I've scrolled through your gallery, and I have to say not only does your stuff look great, but I also liked to look at your process for studies. I'll have to put my thinking cap on and start doing those again. I think the way that you have of taking notes and trying to "explain it to yourself" is the best way to learn and I had forgotten about that! Time to get back to it :smile:

And now.... the finished piece! :muscle:

You were right about things just coming to me as I just sit my butt down and start to scratch at it. Everything fell right into place! Thinking is good sometimes, but doing is better those other times... :laughing:

It's now time to move on to the next piece :moyai:

I'll use this post as a bit of a journal as I tinker on this piece. Feedback is more than welcome, of course :smile:

This is still very much in the research phase, but I think I'm starting to get the handle of it. I'm aiming for a subtle but trippy look for the trees/roots in the background, and for the necklace to look like it's guiding the user through this environment. I'll rework the silhouettes of the trees at the back of the hand to push that further.

I think the values are somewhat okay, but I'll change the fire-like magic and little blobs to give it more perspective and sell the idea of guidance better. The hand definitely needs some kind of rim lighting to make it stand out, but the shapes are probably too big at the moment. For the blobs, I'm not 100% sure I'll be keeping them. I just felt like the image felt a bit empty without something framing the hand. I also have the feeling that the hand holding all of the warm colors in the center of the piece feels a bit... idk, rough. Like it stands out, but a bit too much. I need to add some warmth to the background to balance the colors out, I think.

Other than that, the obvious: the pendant/crystal design is lame at the moment. I'll work on giving it a better design with some metallic coils so that I have a good chunk of small details with a lot of contrast for the center of the image.


'til next time! :blush:

Update on the latest painting

1) Trees/Roots background: I think I've mostly figured this part of the painting, and I just need to render it some more to finish it. I've added some warmer tones around the lighter chunks of the spiraling trees so balance the colors a bit better. I think a hint of pink/yellow will make the background a bit more interesting and will help the main focus of the painting with these colors to merge with it more naturally.

2) The hand: A friend recommended some more red to simulate a better translucence on the skin. I also added some blues and purples to reflect the light from the environment. I may still need to add some more of those colors other than the contour of the hand, but I'll see how it goes. I think I need to put a better contrast between the hand and the necklace to make it "pop" better. I might try to make the pendant a bit bigger on the left side to center it better on the palm of the hand.

3) Light blobs/magical effect: I've removed those as to not distract myself right now, but I'm not 100% decided on this. I still think that an additional element of "magic" could make the storytelling better, and make the hand feel more "anchored" in the background. I'll keep testing some things and see what happens.


I cannot describe the feeling that I got when I saw this. I think you should use this as a milestone for yourself. Always remember it. Just look at the difference between the final submission and the critique request.

I didn't follow through with doing critiques on all of your pieces but I think you finally understand what might be wrong with them on your own using the knowledge and resources you've gained.

Your rendering and textures are great. You have a fantastic work ethic and turn around time. Art directors will enjoy how clearly you follow requests. This was a massive over paint and redo - and you had good turn around time from communication.

And....is that blank space ghost causing me psychic torment? Classic blank space ghost. If that is an homage to this critique thread - I am truly honored. :blush:

You have proved that creativity is certainly in the act of doing.

It looks like you are doing a great job with your thinking cap on this one. So far all your decisions have improved it. Follow those ideas and instincts.
Remember to just look at it front ways, back ways, upside down, thumbnail sized. Take breaks from it and sketch something else. Go look at some artstation walls and be inspired.

Imo - some little sprinkle sized magic effects pulling the eye around and back to the focal could be something - or glowing sprinkles that make a fire shape from the object - but the blobs had too much weight good call. Glow effect again like the last one. Try it out. Doesn't work or jump starts a new idea - even better.

The pinky is probably true to ref - but is a little distracting form the purpose of the piece. But you will probably work that out in your own time. I think you are perfectly capable of solving many of the problems simply because you are observing and noticing them. Observational skill is in full swing for you as well.